That time of the year everyone looks forward to.

In all the festivities, don’t forget to remember and give thanks to the one whose purpose in coming was to save us for himself. God Bless you….
That time of the year everyone looks forward to.
In all the festivities, don’t forget to remember and give thanks to the one whose purpose in coming was to save us for himself. God Bless you….
A lthough things are not perfect
B ecause of trial or pain
C ontinue in thanksgiving
D o not begin to blame
E ven when the times are hard
F ierce winds are bound to blow
G od is forever able
H old on to what you know
I magine life without His love
J oy would cease to be
K eep thanking Him for all the things
L ove imparts to thee
M ove out of "Camp Complaining"
N o weapon that is known
O n earth can yield the power
P raise can do alone
Q uit looking at the future
R edeem the time at hand
S tart every day with worship
T o thank God is a command
U ntil we see Him coming
V ictorious in the sky
W e'll run the race with gratitude
X alting God most high
Y es, there'll be good times and yes some will be ba! ! ! ! ! ! d, but...
Z ion waits in glory...where none are ever sad!
The trials of this time and all other times for mankind, will be made an end to. And we will have a thousand years with Jesus as our King and our brother on a new earth.
are glued to a plastic bag sphere to make a rough pumpkin shape.
And since Halloween is just a few days away I thought this would be a great little project. Maybe you too. The link for the instructions starts here: http://miniatures.about.com/od/halloweenminiatures/ss/paperpumpkn.htm

I found this really cute picture of some patchwork pumpkins in a Google search and had to follow the link.

To find the pattern, floolw this link http://rachaelrabbit.blogspot.com/2008/10/tutorial-simple-patchwork-pumpkins-and.html
have fun!
 |
One of the neatest tricks in crochet is joining. When done right it is nice and neat; when done wrong it gets a little lumpy. It is very easy to do and those patterns that say to join with a sc may be better off if you use this little trick instead.

The piece in the photo is for the lace overskirt to Miss July 1998. I am doing it in size 20 thread and a #8 crochet hook.

 |


the Millinea Mint project, I pulled out the pattern i had that has that really beautiful bodice and the really very incorrect pattern for same bodice and decided to give it another try. I will not say how many times i have tried to get this pattern correct but I did manage to do it this time!!!! I did it Saturday and today I am going back over it to make the corrections that always seem to need to be done so that you can have a copy of the pattern for the bodice if you are interested.

This is the bodice before the last row that goes on around the neckline. While working on this i decided that it was just too good not to pass it up, to make this into a ballerina outfit. It will have layers of gathered tulle for the under skirt and panties.From there gold thread can be used to make trim around the edges, feathers or other trim can be added and any ballerina outfit will appear from the crocheter’s imagination.

I have some really good links for doing makeovers in case anyone is interested.
The first one is for restoring Barbie’s hair.
http://www.rebeccachulew.com/ezine/hairrescue.html
i that doesn’t work then you might want to try re-rooting….
http://www.wideeyedgirls.com/rerootinstruction.html
In either case you may need some styling help….
http://members.fortunecity.com/customdolls/hair1_page.htm
But then, if all goes wrong there is always this one
http://www.rebeccachulew.com/ezine/moldedhair.html
and then there are some other tips that may come in handy…
http://www.geocities.com/RodeoDrive/Mall/3309/customizingtips.htm
In any event these pages have been up for a long time and who knows how much longer they will still be up. So, if you are interested, now would be the time to collect this information and store it on your computer.
I have trim finished and on the bodice. I cannot finish the outfit or the bodice till I can get some more mint thread ‘cause i don’t have enough. I will save this thread that I have for the over-skirt and the new thread will go for the petti-hoop underskirt. This is just in case they don’t match. I also need to get some size 30 mint thread for the placket which I can get from Simply Treasures or Herrschner’s. The thread I used was Royale size 10 and I don’t know how well the new thread is going to match.
In case you didn’t know it those little miniature wooden clothespins are great for holding trim in place…

Because of copyright issues this pattern cannot be given out but I will show you here what i did.

The finished bodice (well, the nearly finished bodice) looks like this….

Sorry that i didn’t have the size 30 thread to finish the placket for this installment and it will probably be a month before I can get more thread so I will have something else in the meantime.

 I have put them together in the file you can find here.
I have acquired a few of the patterns i had been wanting over the years and so now have the lovely choice of working on this or that one and am having trouble deciding which to work on first. So i guess i will work on several at the same time.
Usually when i get a pattern i try out the lace that goes on the neck line and shoulders. That is the icing on the cake. But if the icing does not turn out right then the cake is not going to get done. I do think I work differently from others, and this is not the way i work if i am doing a pattern from the start. Any way of was working on 2000 Millennium Collection for March (the only one i have right now from this year) found out, so far, that the trim was done in size ten according to the pattern but size 20 on the model and I always hated how it dipped way down in the front when I wanted it to go around the neckline of the dress. I did the lace according to the pattern and, yes, that confirmed what I already knew, so I will have the lace done for the neckline later. I set it aside to do the bodice.
I have always hated the way the bodice instructions do not come near the look on the model so i knew i was going to have to re-do it. So i did. I have the pattern if anyone wants it, but I just did a generic pattern not according to the model either. Somewhere in-between this nightmare and reality is the real bodice that I cannot seem to find. But here is what this one looks like...

And then i took that apart to the waist and put on my own little bodice pattern here with photo below.

And then did the sleeves. And it tickeld me that they came out so cute and perfect. Both bodices and the sleeve are included in the patten So have fun (for those into this kind of crochet work) I have to do some more crocheting.
For those into fashion - you will love this information. It's what goes on under the clothes that make the silhouette. Don't neglect clicking on the link.
Another item of interest this morning is freevintageknitting.com/doll-clothes-patterns. I know this is knitting but for those who knit also you will enjoy this finding.

How about a little doily just for the 12” and under crowd?
Sometime ago i was wanting one for a little table i saw at the Victorian Woodshop. I still don’t have the table, but i can dream. Anyway, i have the doily! This one is 2 1/2 inches across and if you want one a little large just make it in size 20 thread or if you want it for 1/12 scale make it in tatting cotton or finer (size 70 – 100). So here is the pattern….

Ch 4 and sl st to form ring
Rnd 1: 12 dc in ring
Rnd 2: (Sc, ch 2) in each dc around, sl st to first sc.
Rnd 3: Sc in joining, ch 4, 3- tr cluster in next ch-1 sp, ch 4, sc in next sc, around, ending with a tr in first sc.
Rnd 4: *Sc ch 4 lp/sp, sc in next ch 4 lp/sp, ch 4 rep from * ch 4, join to first sc.
Rnd 5: * Sc in next loop, (ch 3, sc) twice in same lp, rep from * around ending with sl st to joining.
Rnd 6: Sl st to next lp, 3-dc cluster in same lp, * ch 4, 3-dc cluster in next loop twice, rep from * ending with sl st to first cluster
Rnd 7: Sl st sc in next ch-4 lp, (ch 3, sc) in same lp 3 times, sl st in each cluster, sc in next ch-4 lp, rep from * around ending with sl st in each cluster and first sc.
Rnd 8: * 2 sc in next ch-3 lp, (2 dc, ch-3 picot, ch 1, 2 dc) in next (center) lp, 2 sc in next lp, ch-3 picot, ch 1, rep from * around ending with sl st to first sc, fasten off.
What the top of my computer table looks like? It’s a mess!!!

a mess of dolls!
I was looking through my boxes of dolls (like bleumarine and others, I have to keep my dolls in boxes for lack of room and keeping them from messed up hair) And so i took out 3 to add to what i had up here already. Two are from the Star set of dolls and one is in here original outfit., but i can’t remember her name. If anyone can tell me i would really like to know. The other is a Jazzy and she is one of 4 that i have; i am missing the one in the black outfit with the cute little hat.
I lost a lot of my dolls when my marriage broke up and then when i came up here from California. However with the help of my daughter, my girlfriend in Calif., thrift stores and ebay i have managed to get a hold of those that were my favorites and a few others.

Well, I prayed and my heavenly Father answered and said He will meet the need for healing and a job but you know how it goes when the situation is still there and though you have a load lifted from your shoulders little change goes on for awhile. That is when i “find” Little Blessings. Something silly (like the bubbles that float upward when i pick up the dish detergent bottle, Bear (my granddaughter's cat) rubbing up against my leg as he passes through the kitchen, or Fiona’s (Diana’s cat) who give my such sympathetic looks when she know things aren’t going right. And my favorite music such “Into the Day” and “Bring Me To Life” from Bebo Norman’s Album “Between the Dreaming and the Coming True”. Such treasures i tuck away in the scrapbook of my heart. The photo of the hard-cooked egg in the shape of a heart came as a surprise them morning i cut it open. Then I remembered the time that i had asked my heavenly Father, for a little something like a heart shaped hard cooked egg. This was that answer. God does hear and answer prayers; just usually it does not happen like we would want them to. And i thank Him most for his constant presence helping me through the days.
I received my package of the rayon thread mentioned in a previous post today, and the results are being tallied.
The Razzle is not as shiny as normally rayon is; looks about the equivalent of size 8 pearl cotton. I did a little sample swatch and the thread comes up with 8 sc and 9 rows of sc equal an inch.2 rows of dc = 1/2 inch.
Pearl crown Rayon, however looks like the proper round thread that you would expect and the same amount of shine. It looks about the weight of #8 pearl cotton. After doing some sample swatches the findings are listed in the chart below.
| Thread Name | Hook Size | sc per inch | sc rows per inch | dc rows per 1/2” |
| Size 10 | 7 | 8 | 8 | n/a |
| Size 8 | 8 | 9 | 11 | 2 |
| Razzle | 8 | 8 | 9 | 2 |
| YLI Pearl Crown | 8 | 9 | 11 | 2 |

Samples are done in Razzle (black), Size 8 (DMC Pearl Cotton), Pearl Crown Rayon (Dk Rose #118). These are done with as many stitches will fit in an inch plus one for turning and then as many rows as will fit within an inch. Then two rows of dc fit well in 1/2 inch so i left it and did a little fan stitch to make it look pretty. I keep these with a note attached as to what size yarn or thread and and size of hook and the stitch count..
If you tried out the sc braid from the previous post you will be ready for these variations. These are all worked with just one stitch – single crochet stitch and worked ‘single file’ so-to-speak or one on top of the other. But when you put your hook into different parts of the stitch (bet you didn’t know there were so many), you can find differing patterns.
The nice little braid done in the previous post used two strands of thread. This particular one and the following variations, use only one strand
as marked in the above photo. This little braid makes it real easy for working off the one side to which you can make a little ruffle. This would work really cute for the little Kelly dolls.
The next two braids require turning each row; both examples are shown here with a line to show the difference.
for the first one…

you turn the row with the right edge going to the left and put you hook where the line indicates and in that direction.
Don’t forget you can click on the photos to get the larger view. I know my line is not very thick, but i could not get a clearer shot and figured this would make it easier to understand.
The other braid is the same but you turn the left side to the right, and use the same little loop. Always chain 1 to turn.
Today is the day for stitches; don’t have any reason except that when you crochet you eventually want to add to your repertoire of stitches something new and different. especially if you do any of your own doll crochet work.

works on Multiples of 3
Row 1: ch 2 (which counts as first dc), [dc, ch 2, sc] in 3rd ch from hk, * sk 2 sts, [2 dc ch 2, sc] in next ch, rep from * across, ch 2 (counts as first dc of next row), turn.
Row 2: ch 2, [dc, ch 2, sc] in first ch--2 sp,* sk 2 sts, [2 dc, ch 2, sc] in next ch-2 sp, rep from * across, ch 2 (counts as first dc of next row), turn
Sample was worked in Omega #20 cotton and #8 hook on 21ch and measures 2 1/16" x 7/8 inch (5 rows)

work on Multiples of 3+2
This is really a v-st in hdc but in Mon Tricot of 1972 it was called the begonia stitch
Row 1: [hdc, ch 1, hdc] in 3rd ch from hook, skip 2 ch, [hdc, ch 1, hdc] in next ch, rep from* across ending with sk 1, hdc in last st, ch 2 turn.
Row 2: [hdc, ch 1, hdc] in ch-1 sp of each v-st across, hdc in top of turning ch or first hdc, ch 2 turn.
Sample was worked on 23 sts in #20 cotton and #8 steel hook and measures 7/8 " w. x 1 inch (7 rows)

ch 2, sc in 2nd ch from hook, ch 1, then insert hook through the two strands as indicated in photo….


I have found some rayon thread that i am going to try out and thought i should also share the link for those who haven’t found this.
Razzle Rayon similar they say to #8 crochet cotton, but they mean pearl cotton and comes 250 yds on a spool. Anyway I am having a tough time deciding what colors to get. It shouldn’t make to much of a difference if using it for a blouse (similar to Paradise P-079)…

![]()


![]()
The first one is white, of course but then there is Baby Pink, Peony Pink,Light Country Blue. there such other lovely colors.
The next one is YLI Pearl Crown Rayon. The write-up is as follows:
”Pearl Crown Rayon is one of the most versatile decorative threads on the market. This rayon is a highly twisted, thicker, threadlike cord. It is a versatile decorative thread that will fit many of your creative needs, both on the serger and the sewing machine.”
Which means that multiple strands are going to be needed. Just want to try it out; YLI has a gold that might just work out for the Paradise P-077

This thread (Pearl Crown Rayon by YLI Corp) will not look as nice as the thread i had picked up from Super Yarn Mart years ago, but maybe it will work; the color looks correct.
![]()
Also found today, a place on eBay that you can get sport weight and fingering weight (finally found the fingering weight but i was really having a good time looking) chenille yarn. You want to go to www.thechenilleshack.com store on eBay. She is super to deal with.

I put a circle of clear plastic under the crocheted top to give the support needed. This makes the wire not needed; my little experiment did not work. Another thin i noticed is that the synthetic straw had more body before i had to dampen it to make it lie flat.

I then thought that it would be really neat to have a glass top for the table. The you could see the top row of decorative stitching on the base. So what do you think?
Now i have to wait for some more money to get more spools of straw to work on the other pieces. I also found some Rayon that I want to get and try out.
Well, I finally have the Table-top almost finished and here is the photo and extra notes on working with this stuff. I decided while working on the table-top that it would be a shame to put cardboard or plastic under it because it would loose the lacy look. So i decided to use florists’ covered wire to re-enforce the stability and encourage a flat table top. so….

for rounds 7 & 12 and requires piecing the wire on round 12. I also based the circle on a beginning of 7 sc in 2nd ch from hk. and worked the next 2 rows as 2 sc in each st. and went form there. 11 rows of single crochet made a 6 inch circle.
The border (rnd 12) I changed to: sc in joining, sk 2, open fan shell of [dc, ch 1, dc, ch 2, dc, ch 1, dc] in next st, sk sts, sc in next st, rep around sl st join to first sc and fasten off.
The wire has to be pieced and overlapped; this is a little tricky. The straw does no cooperate very well and has to be made to behave quite frequently and add to that the extra wire…well you can see it is not a very long piece that is required. And trimming the length of the wires after you are done is best.
It is easy when finished to fold down the edging and have it old it’s shape though. That is a plus and if you have to block it a little to hold have the table top perfectly flat then spray with a fine spray, not too much, on both sides. This stuff get really weird when wet and you don’t want to lay anything on it to the natural texture of the stitches will disappear. Do not pull on it to much either; pull gently on opposite sides rotating the circle till the circle is perfectly shaped and let dry on flat surface.

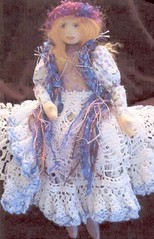
Here is another one of those darling dolls dressed with a doily skirt. Too Cute!!!! you need to see her other items.
Sorry, I don’t have an iron so i cannot press it nice and smooth and pretty and these sheets do not have any polyester fiber in them. They are all 100% cotton. But they are a very nice cotton and will last a long time.
This sheet set is a very lovely pale creamy yellow and the edging is done in white. I had to get a double size because Bi-Mart did not have them in a twin size with the specifications that i gave my daughter when she went looking for them but they will do anyway on my single (twin) bed.
This is one of my favorites; better than the original, i just love the words

Isaiah 28:16
"So this is what the Sovereign LORD says: "See, I lay a stone in Zion, a tested stone, a precious cornerstone for a sure foundation; the one who trusts will never be dismayed."


